Lighting Options for Zone 1 Bathrooms: Zone 1 Bathroom Ceiling Lights

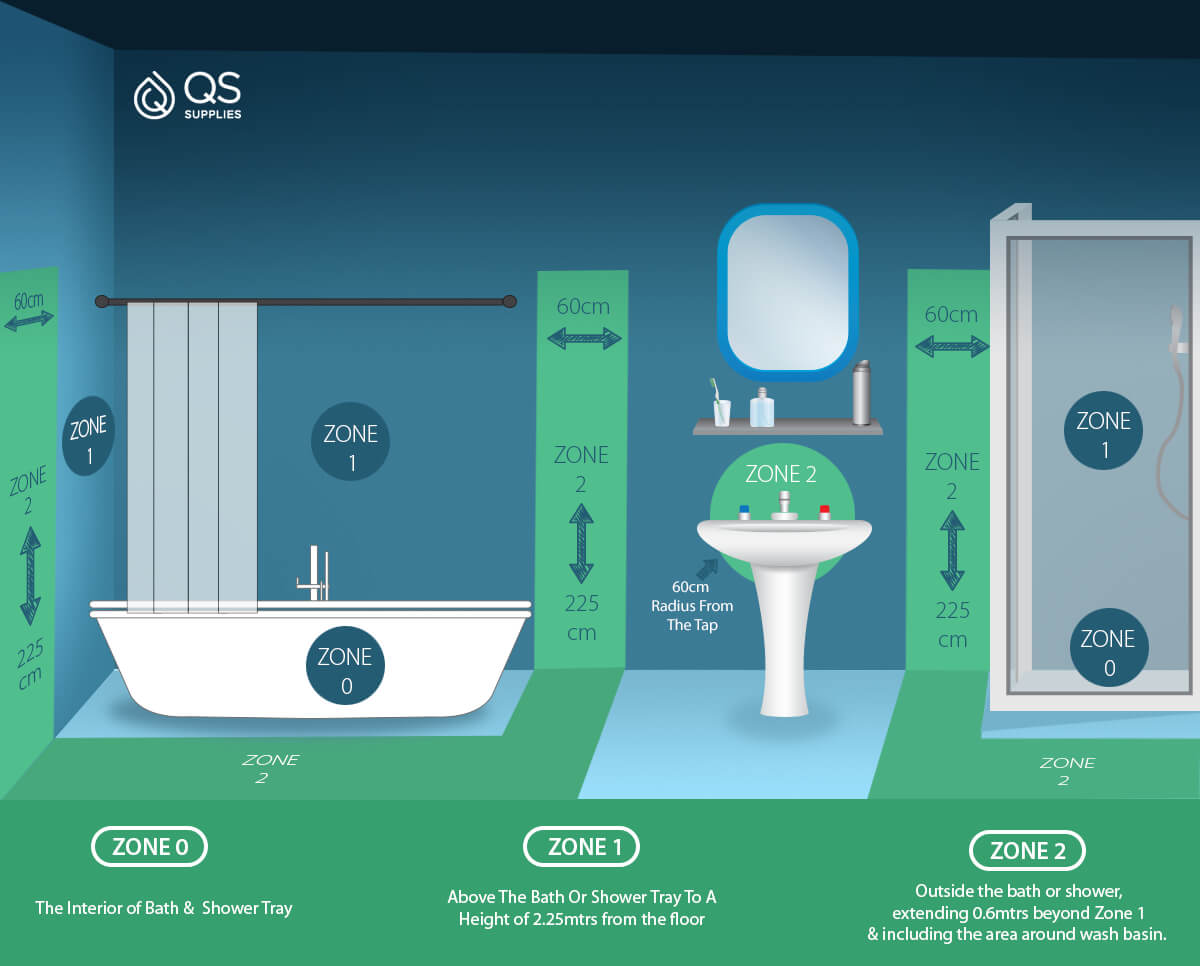
Zone 1 bathroom ceiling lights – Zone 1 bathrooms, characterized by their proximity to water sources like bathtubs or showers, demand specialized lighting fixtures that ensure safety and functionality. Various types of lighting fixtures cater to the unique requirements of Zone 1 bathrooms, each offering distinct advantages and considerations.
Recessed Lighting
Recessed lighting, also known as can lights, offers a sleek and unobtrusive solution for Zone 1 bathrooms. These fixtures are installed flush with the ceiling, providing diffused and evenly distributed illumination. They come in various sizes, shapes, and finishes, allowing for customization to complement bathroom aesthetics.
Advantages:
- Unobtrusive and aesthetically pleasing
- Provides even illumination without shadows
- Suitable for low ceilings
Disadvantages:
- Requires professional installation
- May require additional insulation to prevent heat buildup
Surface-Mounted Lighting, Zone 1 bathroom ceiling lights
Surface-mounted lighting fixtures are attached directly to the ceiling, providing a simple and versatile option for Zone 1 bathrooms. They come in a wide range of styles, from traditional to modern, and can be used to create a focal point or accentuate specific areas.
Advantages:
- Easy to install and replace
- Available in a variety of styles and finishes
- Can be used to create accent lighting
Disadvantages:
- May be more obtrusive than recessed lighting
- Can accumulate dust and moisture over time
Wall-Mounted Lighting
Wall-mounted lighting fixtures are mounted directly to the wall, providing task lighting or ambient illumination in Zone 1 bathrooms. They are particularly useful for areas near mirrors or vanities, where additional lighting is often required.
Zone 1 bathroom ceiling lights illuminate the often-overlooked corners of your bathroom, casting a warm glow that transforms your daily routine into a moment of self-care. However, for optimal ventilation and moisture control, consider pairing these lights with top rated bathroom extractor fans.
These fans effectively remove excess humidity, preventing mold and mildew growth, while maintaining a comfortable ambiance in your bathroom sanctuary.
Advantages:
- Provides focused lighting for specific tasks
- Can be installed at various heights and angles
- Available in a variety of designs and finishes
Disadvantages:
The illumination of a bathroom, particularly in Zone 1, where moisture and electricity coexist, requires careful consideration. When it comes to applying makeup, the right lighting is crucial for achieving a flawless finish. Check out best bathroom lighting for makeup for expert insights on selecting the perfect fixtures for your vanity area.
With the appropriate lighting, your makeup application will be transformed, allowing you to confidently navigate the intricacies of contouring and highlighting, all within the confines of your well-lit Zone 1 bathroom.
- May require additional wiring and installation
- Can be more obtrusive than other types of lighting
Design Considerations for Zone 1 Bathroom Ceiling Lights

When selecting ceiling lights for Zone 1 bathrooms, meticulous attention to size, shape, and overall bathroom layout is paramount. The judicious placement of multiple ceiling lights ensures optimal illumination, creating a harmonious and functional space.
Size and Shape
The size and shape of the ceiling lights should complement the dimensions and architectural features of the bathroom. For smaller bathrooms, compact and sleek fixtures minimize visual clutter. In larger spaces, expansive chandeliers or recessed lighting can create a dramatic focal point. Circular, square, or rectangular shapes can enhance the overall aesthetic, depending on the bathroom’s décor and design scheme.
Layout and Décor
Consider the overall layout of the bathroom when positioning ceiling lights. Centering a single fixture above the vanity provides ample task lighting for daily routines. Multiple ceiling lights, strategically placed around the room, can evenly distribute illumination, eliminating dark corners and creating a more inviting ambiance. The style of the light fixtures should harmonize with the bathroom’s décor, whether it’s traditional, contemporary, or eclectic.
Multiple Ceiling Lights
In larger bathrooms, multiple ceiling lights can be employed to achieve optimal illumination. Recessed downlights, flush-mounted to the ceiling, provide general lighting throughout the space. Wall-mounted sconces flanking the vanity or mirror offer additional task lighting. A statement chandelier or pendant light can serve as a decorative centerpiece, adding a touch of glamour and sophistication.
Installation and Safety Guidelines for Zone 1 Bathroom Ceiling Lights
Installing ceiling lights in Zone 1 bathrooms requires careful attention to safety and adherence to specific regulations. This guide will provide a step-by-step approach to ensure a safe and compliant installation.
Step-by-Step Installation
- Plan the Layout: Determine the desired location and number of ceiling lights based on the bathroom’s size and layout. Ensure proper spacing between fixtures for even illumination.
- Electrical Preparation: Install a dedicated circuit for the bathroom lighting, protected by a ground fault circuit interrupter (GFCI) for added safety.
- Wiring: Use moisture-resistant electrical wire and connect it to the circuit breaker or fuse box. Ensure all connections are secure and meet electrical code requirements.
- Mounting: Secure the ceiling light fixture to the junction box using appropriate screws or bolts. Ensure the fixture is level and stable.
- Connecting Fixtures: Connect the fixture’s wires to the electrical wires in the junction box, matching the colors (black to black, white to white, green or bare to ground).
- Final Inspection: Double-check all connections and ensure the fixture is securely mounted before turning on the power.
Safety Precautions
- Electrical Safety: All electrical work must be performed by a licensed electrician to ensure compliance with electrical codes and safety standards.
- Moisture Protection: Choose fixtures specifically designed for Zone 1 areas, which have a minimum IP65 rating for moisture protection.
- GFCI Protection: Install a GFCI in the circuit supplying the bathroom lighting to prevent electrical shock in the event of a ground fault.
- Ventilation: Ensure proper ventilation in the bathroom to prevent moisture buildup, which can compromise the safety and longevity of the fixtures.
